Before You Start
Windows 11 or Windows Server 2022 / 2025 (64-bit)
Windows 10 is not supported.
Administrator account
The installer must be run as Administrator and requires the password for a local Windows account to register the service.
Internet connection
The installer downloads WSL2, Ubuntu 24.04, and SearXNG automatically during setup.
Step-by-Step Installation
1
Download and Extract
Download OllamafySearxng.zip from the Downloads page.
Once downloaded, right-click the ZIP file and select Extract All, then choose a folder such as your Desktop or Downloads.
2
Run as Administrator
Open the extracted folder, right-click Install SearXNG.exe, and select Run as administrator.
If prompted by User Account Control, click Yes to allow it to run with administrator privileges.
Must run as Administrator. The installer enables Windows features, creates a service, and configures the firewall — all of which require elevated permissions.
3
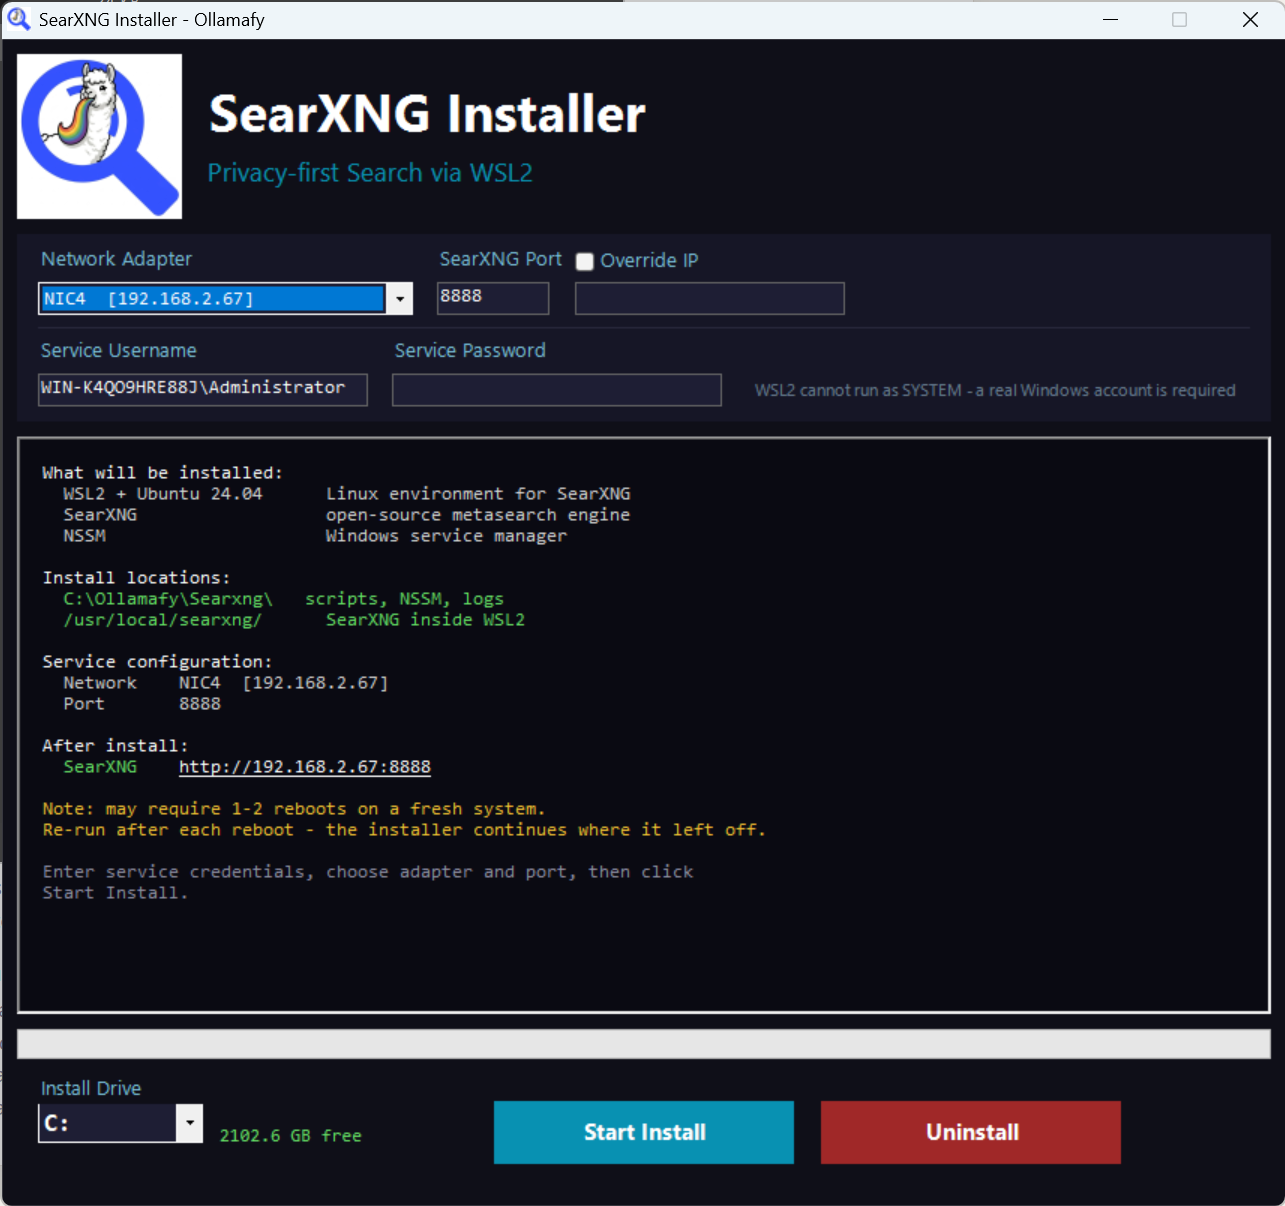
Enter Service Credentials
In the Service Username field, enter the Windows account the service will run under.
For a local account use the format .\Administrator or COMPUTERNAME\Username.
Enter the matching password in the Service Password field.
Why is this needed? WSL2 cannot run under the Windows SYSTEM account, so SearXNG must run as a real user account that can launch a WSL2 session.
4
Choose Network Adapter and Port
Select which network adapter SearXNG should listen on from the dropdown — for example your LAN adapter to make it available to other devices on your network.
If you want SearXNG on all interfaces, tick Override IP and enter 0.0.0.0.
The default port is 8888 — change it if that port is already in use.
5
Choose Install Drive
Use the Drive dropdown to select where SearXNG will be installed.
The installer will create DRIVE:\Ollamafy\Searxng\ for scripts, logs, and NSSM, and store the WSL2 virtual disk (VHD) at DRIVE:\Ollamafy\SearXNG\.
Make sure the selected drive has at least 4 GB free.
6
Click Start Install
Click the Start Install button. The installer will work through each phase automatically — enabling WSL2 features, downloading Ubuntu 24.04, installing SearXNG inside the Linux environment, registering the Windows service, and configuring the firewall.
Progress is shown in the log panel and progress bar.
7
Reboot if Required
On a fresh Windows installation, enabling WSL2 requires one or two reboots.
The installer will prompt you automatically when a reboot is needed.
After rebooting, re-run the installer — it will detect where it left off and continue from the next phase.
Already have WSL2? If WSL2 is already enabled on your machine, reboots are typically not needed and the install completes in a single run.
8
Installation Complete
Once the installer validates that the service is running and the page is responding, the log panel will show Installation Complete.
SearXNG is now running as a Windows service and will start automatically every time Windows boots.
A SearXNG shortcut is placed on the Desktop pointing to your configured URL.
9
Open SearXNG
Open a browser and navigate to the URL shown at the end of the install — for example http://192.168.1.10:8888 — or double-click the SearXNG shortcut on the Desktop.
You can also manage the service at any time from the installer using the Start and Stop commands shown in the log.
Managing the Service
Once installed, SearXNG runs as a standard Windows service and can be started, stopped, or restarted from the Windows Services Manager like any other service.
1️⃣
Press Windows + R, type services.msc, and press Enter to open the Services Manager.
2️⃣
Scroll down the list and locate Ollamafy SearXNG.
3️⃣
Right-click the service and select Start, Stop, or Restart as needed.
The Startup Type is set to Automatic by the installer, so SearXNG will start with Windows automatically.
If SearXNG does not start as expected, check the logs at DRIVE:\Ollamafy\Searxng\logs\

Ready to install?
Download the installer and have SearXNG running as a Windows service in minutes.
Download Installer Download Source View product page →